Quick Navigation
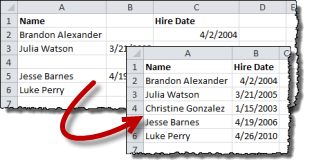 Data doesn’t always import or paste into Excel as nicely as you want. Sometimes, all the information is there, but extra blanks and spaces are carried along with the data cells. At first glance, this looks like it could be a very tedious problem to solve… It could take ages to manually take them out, and sometimes the data order is sensitive, so it can’t be sorted (to bring all the blanks together). Fortunately, there is a way to select all the blanks in a selection simultaneously for deletion. Let’s walk through an example of how…
Examine the Data
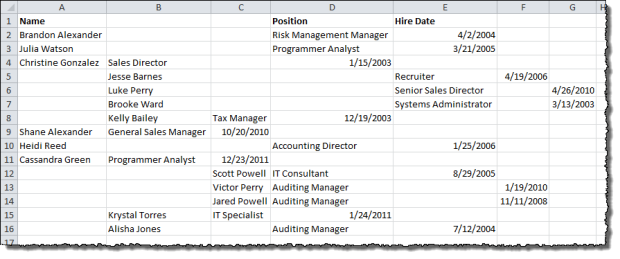
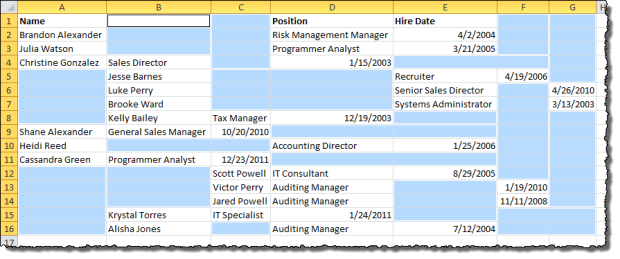
Here is a typical import… We have Employee Names, their Roles, and their Hire Dates, but they are not in the proper columns…
Select the Blank Cells
Let’s get them sorted out. Select the data range where there are blanks to remove.
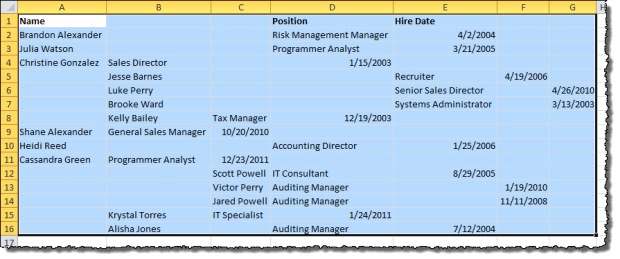
Press F5 and click Special in the Go To dialog that appears.

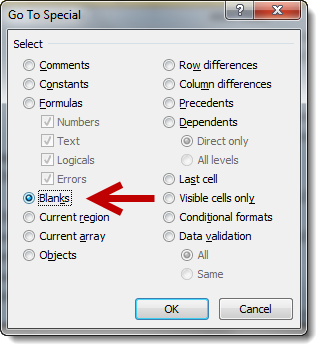
In the Go To Special dialog box, choose Blanks and click OK.
The spreadsheet should now look like this, with only the blank cells selected.
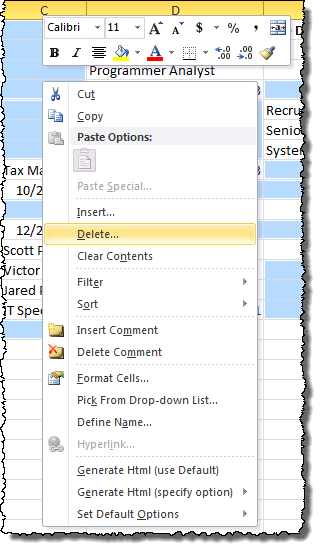
Right-click within one of the selected cells, and choose Delete in the drop-down menu that appears.
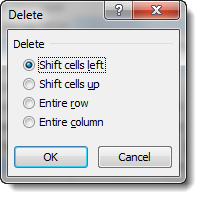
Excel will now ask which direction you want it to shift the cells that remain. In this example, choose Shift Cells Left and click OK.
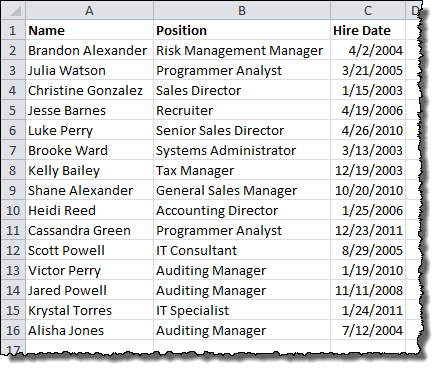
The result should be the beautifully organized data that you wanted all along!
Great tip! Thanks for posting – it saved ma huge amount of work.
Awesome tip Thanks a ton ! Saves a lot of time !!!
Thanks a lot, great tip and so simple. Appreciate you taking the time to post it.
Thanks, just what I needed.
Thanks, it really help me.
Thanks a ton! This saves a lot of redundant manual work. I appreciate it. If there are similar excel data procedures that are commonly used, I would highly recommend adding those on the side of the webpage in a column where viewers can go to.
yuhuhhuhuhu after entering a lot of line breaks in a cell and 4 hours of internet search finally I found what I wanted….shift cell left that is all I was looking for :). THANK YOUUUUUUUU
Dude you’re a legend!!!! THANK YOU!!!
Great, that’s exactly what I was looking for!
Genius! Will help with so much work!
Great tip to clear blank cells…..thnx
wow! thats great trick… happy that I visited this page!
Great tip. Thank you soooo much!
Great tip… Thank you
Great tip… Thank you
Thanks Guy. this saved my day.
Amazing! Much better than the other tips I found!
why was something so simple so difficult to find? thanks for making it easy!
Thank you so much. It has saved me so much unnecessary work. Your tips are awesome.
I did exactly that but received a message saying “No cells were found”.
The cells I copied have formulas and if functions. Is that why “No cells were found” even thou the cells are blank?
Hi AK!
Yep – that’s why… If you don’t care about preserving those formulas, you can Copy->Paste Values to remove the formulas from the blank cells (will remove the formulas in all the other cells too).
Superb tip thank you so much!
THANK YOU
Gosh, thank you.
I’ve been looking for a way to do this, but all of my cells shift up, and it needed to be with VBA
For anyone looking to remove blank cells in a defined range (just one column, etc) with VBA:
Sub RemoveBlanks()
Dim RangeToRemoveBlanksFrom As Range
‘ Set your range here (I’ve selected column A)
Set RangeToRemoveBlanksFrom = Sheets(1).Range(“A:A”)
‘ Use .SpecialCells(xlCellTypeBlanks) to select the blanks, .Delete to delete, and
‘ the parameter Shift:= to determine how to shift the cells. Here, I use xlUp because
‘ that is how I need my data to flow. You can use xlLeft, xlDown, xlRight as necessary
‘ If you record this as a macro, you will get .Select, and .Selection.Delete
‘ Select is bad practice in macros, it is slower than defining the range and performing
‘ the function (FYI!)
RangeToRemoveBlanksFrom.SpecialCells(xlCellTypeBlanks).Delete Shift:=xlUp
End Sub
the comment mark is not correct. use ‘ rather than ‘.
The VBA code came back with error
RangeToRemoveBlanksFrom.SpecialCells(xlCellTypeBlanks).Delete Shift:=xlLeft
Very good tip, clearly explained with screen shots. Thank you 🙂
perfect -just what I wanted 🙂
I still haven’t found a way to condense the columns I’m looking for. Here is my example… Column A Cell A1 (1) – A50 (50). So 1 through 50. In column B and C there are number values. B1 (2) C1 (2) , B2 “blank” C2 (2) , B3 “blank” C3 “blank” , B4 (2) C4 “blank”.
If I filter this to kick out the blank cells in B and C then it kicks out some of the data I needed. I would be happy to send pictures if someone know how to do this. I’ve tried literally everything to include slicers etc.
Is it possible to delete multiple blanks while preserving the row that the cell is in. For example, if there were blanks above the cell in the column it was in but there was already information in the same row. It is possible to shift cells up but only up until the point that the cell would shift to a different row.